Wednesday, September 4, 2013

Making Aria - Drafting and sewing - Part 3

Part 3!  I'll try and cover all the sewing aspects in this section!  It's going to be a doozy.  (OK, that's a lie, depending on how long it takes me to write I may still cut it in to another 2 parts)

When I was first making my headpiece sculpt, I was still trying to decide what costume to make.  I knew I wanted to make an Asari, but I was toying between Liara and Aria.  I eventually chose Aria because, when looking at her ME2 character model, the costume looked less complicated than Liara's.

So I settled on Aria.

And then the Omega DLC came out, along with a new, more detailed model (and outfit!).  And I started to wonder what I had gotten myself in to.

I draft most of my costumes from scratch.  I decided to start with the very centerpiece of Aria's outfit: The bustier-chest-armor-thing that I still don't know what to call it.

THIS THING:

This is the centerpiece of the entire costume; everything else is either arranged around, or attached to this one piece.  It had to be completely sewn before I would be able to get anything else done.

It was also the hardest piece to make in the entire costume.

There were so many things to take in to consideration with this garment:
The texture of it was different than the body suit, so it had to be a different fabric.
The fabric I was using was an upholstery vinyl with no stretch, so it was going to have to be detached from the bodysuit as well.
The weird little cut-out between the cups meant I couldn't wear a bra with it....So the garment was going to have to be as supportive as a bra, but didn't have any of the main features a bra would (something to pull it together in the center, and no visible straps that go around the back)

This thing was a nightmare to draft and sew.  It took me a solid month of drafting, sewing samples, fitting, re-drafting, sewing more samples, fitting some more, until I was finally able to get it right.

To get a pattern, I grabbed an old bra and used some scrap fabric to copy the cup shape and size.


I drafted up the front piece as well, and sewed together a sample.  This piece came from...very humble beginnings.


I continued adjusting the pattern and re-sewing samples until I was happy with the fit.  (I believe I went through about 4 variations of this, plus I detached and reattached the cups several times per sample)  One of the main problems I had with fitting was the cups kept pulling apart from the center, because there was nothing holding them together.  More on how I fixed this later.

Fabrics used:
Outside fabric:  Carbon Fiber upholstery vinyl
Interfacing: 1 layer of felt, 1 layer of thick Pellon
Lining: Black cotton plain weave

For the felt and interfacing, I cut out the pieces without seam allowance.  I zig-zagged the center seam of the cup together:


I initially had only used the pellon for the bra cups, but didn't like the final shape.  I ended up with very pointy looking Madonna boobs.  I added the layer of felt over top of the pellon, because it softened the center of the cup, and gave it a more rounded look.

The 2 inside layers were then quilted on to the cup lining


The vinyl was basted to the lining, and the edges were finished with a stretch-PVC bias tape.  I needed to use a bias tape to finish the edges, because the order in which the garment was sewn wouldn't have allowed for the cups to be turned right-side-out after finishing.  

I machine stitched the bias tape on at 1/8", and then hand stitched it to the inside of the garment.

FYI The cup does have an underwire, that was harvested from an old bra.

The center cutout between the cups is also wired, so that it will keep it's shape while being worn, and prevent it from stretching.

The inset silver and white pieces were glued on to a backing with contact cement.


Everything was stitched together:  Yay~


The silver panels up top are also made out of upholstery vinyl; they are what provides the "center" support for the "bra".  Since I couldn't have something pulling the  bra cups together at the center bottom because of the cutout, I instead used the panels above the cups to create that support instead.  


Jacket:
Outer fabric: White stretch PVC
Lining: Matte Milliskin (with fusible interfacing to prevent stretching)
Stiffener for collar: Stretch Neoprin (Spacer)

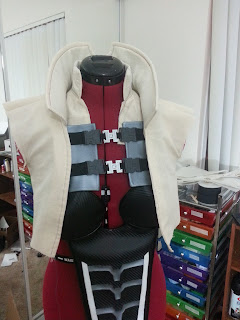
I drafted and sewed up a sample of my jacket based.  I was really happy with how the collar worked out.

The jacket is made from a white stretch PVC vinyl, and the lining is spandex (to match the sleeves on my body suit).  I used fusible interfacing on the spandex for added stability, as well as to prevent it from stretching too much while sewing.  This sort of worked; I still decided that I needed a walking foot to finish off this garment.

Unfortunately, I discovered that they do not make walking feet to fit my sewing machine, so I ended up renting a machine in order to finish this up.

The reason I needed a walking foot was because I was sewing three stretch fabrics together, and each fabric had a different amount of stretch.  The Neoprin I used inside the collar was really stretchy and shifty, and to sew it I absolutely needed a walking foot.


I made a stencil out of masking tape.  I mixed some acrylic paint with a textile medium, and airbrushed the Omega logo on to the back of the jacket:


Boot Covers:

Boots with the correct looking heel and toe were purchased.  I hacked off the top of the boots down to the ankle.


Duct tape pattern drafting at it's finest.


The duct tape pattern was cut in to 4 pieces: inside front, outside front, inside back and outside back


I added a small amount of ease to the pattern, and sewed a mock-up out of muslin.


I then adjusted the pattern for fit, and sewed a mock-up out of a similar vinyl to what the final product would be.  I drew where I wanted the style lines to be on the mock-up, and made another (several) mock-ups until it looked exactly the way I wanted the final product to look.


These boot covers are not actually glued to the shoe; they are sewn kind of like a sock that fits over the shoe.  Check out this tutorial by GSTQ fashions for a better idea of what I'm talking about.  I used the Neoprin spacer in the boots to stiffen them, and add thickness.


After many more samples, the final product is sewn up:


Chaps:

I got super lazy for the drafting on these.  I grabbed a pair of old jeans that I liked the fit of, and drew on the style lines for the chaps.  I then cut them out, and traced them on to paper.

Another mock-up in ugly gold vinyl.


Finished product:


Well, that's it for the sewing portion of the costume!  Here's a list of all the fabrics I used:

Black carbon fiber vinyl - Used on the chest piece, chaps/leg armor, boot covers

Brushed Aluminium upholstery vinyl - Used for details on chest piece and leg armor

4-way stretch black matte spandex (matte vinyl look) - Used on the bodysuit

Burgundy matte milliskin - Used on bodysuit sleeves, and jacket lining

Neoprin Spacer - Used in the jacket collar, and in the boot covers

White stretch PVC/Vinyl - Used on the jacket, and details on the chest piece.  I had this fabric left over from a previous project, but something like this would be pretty similar.


Wednesday, July 24, 2013

Making Aria - Asari Headpiece - Part 2

Alright!  So now that we've got a mold, we need to actually make the headpiece!


Casting

Tools required:
Your new mold!
RD-407 Casting Latex  (I use about 1/2 quart per headpiece)
Chip brushes
Small paintbrush
Dish soap
Baby powder

So I don't have a ton of pictures of me actually casting the latex, since it's a 2-hand kind of job.

I always start by cleaning out any dust and dirt from the mold.  An air compressor or hair dryer works really well for this.

Put a small dab of dish soap on your small paintbrush.  This will help keep the latex from sticking to your brush.  Dip your paintbrush in to the latex and carefully coat the mold walls of all the tentacle tips.  It's really important to make sure the entire tentacle wall is coated with latex, or else you will have holes in the tips of your tentacles.

Once you've coated the tentacles, you can take a larger chip brush (again, mix some dish soap in to the dry brush) and start coating the rest of the mold.  I use a combination of brushing and stippling at this point.  Make sure you avoid getting any air bubbles in the latex, as these will be visible on the finished headpiece..  Wait for the first layer to dry, and then I put 3-5 more layers on.  You want to make sure that around the forehead and the neck isn't too thick (3-4 layers should be good, but you will have to make that judgement!), otherwise it will be really hard to blend the seam line in to your skin.

After I've got a good coating of latex around the whole mold, I pour some additional latex in to the mold and swish it around.  When I say "swish" I mean "Let it ooze around really slowly while my arms are ready to fall off from holding a really heavy mold".  I make sure to let some latex slowly fill up each of the tentacles (Slowly so that I don't get any trapped air bubbles at the tips) and then I set the mold down to cure.  I aim a large electric fan at the inside of the mold to help the latex dry faster.  I also keep checking the mold every 10 minutes or so to make sure no latex is pooling in any one location.  If it is, I use my paintbrush and move the latex around so there's an even coat.


You'll know the latex is dry when it changes color.  I usually let it cure in the mold for 24-48 hours, because the tips of the tentacles can take a long time to dry, and if you pull it out too soon you'll have misshapen tentacles.  Better safe than sorry.

When pulling the cast out of the mold, use baby powder to powder the inside of the mask.  This will prevent the latex from sticking to itself and ruining your hard work!  While you are pulling the mask out, make sure you powder the whole mask really well.


After you've carefully extracted your headpiece, place it back on your lifecast head overnight.  As the latex finishes curing outside of the mold, it will remember the shape it cures in.  If you fold it up and set it aside, your mask will retain that shape.  So keep it on your lifecast for the time being!


Painting

Tools required:
ProsAide (Prosthetic adhesive)
Acrylic Paint
Rubber gloves
Sponge
Paintbrushes (assorted)
Airbrush

Now that you've got a fully cured headpiece, it's time to paint it!  Before doing so, take it over to the sink and give it a good scrub.  I've seen some people clean their latex with citric acid saying it opened up the pores and made it more ready to accept paint.  I didn't have any, so I just used some vinegar and a scrubby brush.

The basecoat you apply to the headpiece needs to be flexible, so that the paint doesn't flake off the latex.  For this, we're going to use PAX makeup.  Calling PAX makeup is a bit of a misnomer, since it is literally acrylic paint and Prosaide prosthetic adhesive mixed in a 50:50 ratio.

Prosaide, black, "brilliant purple"


Mix up your acrylics to get your desired basecoat color.  I mix the basecoat to match my makeup (fun fact!  Liquitex Basics "Brilliant Purple" mixed with a small amount of black matches Mehron Paradise AQ "Purple" really well).  Once you've achieved the desired color, mix the Prosaide in.  The Prosaide is white while liquid, but dries clear, so it won't affect your paint color once dry.

Wearing your rubber gloves, sponge the PAX makeup all over your headpiece.  Fair warning: PAX is super sticky, so avoid touching it when you can.  Do 2 coats if necessary.

Basecoat: Complete
Now that you have your PAX basecoat, you can use regular acrylics to finish the detail work.  The adhesive will cling to the future layers of paint you put on, and keep everything nice and flexible without flaking!

I started off by doing a dark wash of really watery paint, and painted this over the entire headpiece.  The goal is to get the wash in to all the cracks, crevices and textures of the headpiece.

Dark wash: Black and Dioxazine Purple


After the dark wash had dried, I did some dry brushing (Brilliant Purple mixed with a tiny bit of white) in order to lighten up the raised texture.  With dry brushing, you dab your dry paintbrush in the paint, and then wipe off 95% of the paint on to a papertowel.  Then lightly brush the raised texture.  The effect is subtle.


Once both dark wash and dry brushing is complete, I start using the airbrush to add some highlights and shadows.

I start off by adding some shadows in all of the crevices.  I used a combination of purple and black acrylic airbrush inks.

I then added highlights on all the raised surfaces (along the centers of the tentacles).  I used light purple and white watered down acrylics for this.

I added some subtle stripes/mottling with a blue/purple watered down acrylic mixture.

Finally, I used masking tape to section off where Aria's facial tattoo extends on to her lower tentacle, and airbrushed the stripe in.


Voila~  The finished headpiece!


Makeup & Application

Tools required (Items in brackets are the brands I used, but shop around for what works for you!):
Wig cap
Astringent (Witch Hazel)
Craft glue stick
Baby powder
Rubbing alcohol
Prosthetic adhesive (Prosaide or Telesis Beta Bond Plus)
Prosthetic Adhesive remover (Isopropyl Myrisitate)
Make-up sponges
Liquid Latex (Ben Nye)
Barrier Spray (Mehron)
Face/body paint (Mehron Paradise AQ in "Purple" or PAX Makeup)
Eyelid Primer (Neutrogena Crease Proof Eyeshadow Primer "Stay Put Plum")
Eye Liner
Eyeshadow (Your choice of colors for eyes, plus a varying palette that matches your face paint color for contouring)
Eye/Lip liner matching your facepaint (Optional: for lips)


Left to right: Craft Glue Stick, Prosthetic Adhesive, Ben Nye Liquid Latex, Isoproply Myrisitate, Baby Powder,
(in front) PAX Makeup, Mehron Paradise AQ Purple (with sponge and spray bottle), Barrier Spray

Left to right: Black Eyeshadow, Purple Palette, Neutrogena Crease Proof Eyeshadow Primer ("Stay Put Plum"),
Black eyeliner, Purple Eyeliner, assorted brushes


I made this snazzy video to show you how I do my makeup!


Some notes on face and body paints:

There are three options that I was considering for Aria, and here are the pros and cons of each:

Water activated make-up
Sample Products: Mehron Paradise AQ, Kryolan Aquacolor.
Pros:  Readily available at costume shops, Easy to apply, easy to remove, affordable
Cons: Smudges with wear (Anywhere clothing is rubbing), smudges with sweat and tears
Comments:  I use Mehron Paradise AQ in Purple for my Aria makeup.  I really like that it's easy to apply.  I use lots of barrier spray with it to keep it from smudging too much, and for the most part it works.  I get a little bit of rub-off on my body suit, and on the straps on my side.  It mostly comes off where the buckles on my costume rub against my skin.


PAX Makeup
Sample products: Commercial varieties available in limited colors, but better to mix your own with prosaide and non-toxic acrylic paint
Pros: Stays put really well!  Semi-waterproof, can last for days with minor touch-ups.
Cons: A bitch (and sometimes painful) to remove.  Application can be tricky without an assistant
Comments:  This is super durable.  I have used PAX on my sides and chest for Aria before.  Some people do use this on their face as well, but I didn't want to risk it since my skin can be pretty sensitive, and I was aware of how difficult it is to remove.
I was able to shower without this coming off, sleep in it, and then use it again the next day with only minor touch-ups.  During application, after each layer dries you need to powder it with baby powder.  Because it's made from adhesive and paint, it is extremely sticky until you powder it.  I did have some issues with the paint sticking to my buckles and peeling off me at the end of the day, but the damage was minor and easily fixed for the next day.  More baby-powder probably would have prevented this.
If you do decide to use PAX, make sure you get a remover (Isopropyl Myrisitate is what I used).  The issue with removal is that the paint doesn't really wash off....It scrapes off in little balls of paint/adhesive.  Sometimes the little balls get soggy in the bath/shower, and instead of coming off easily, they smear around more pigment on your skin.

Alcohol Activated Makeup
Sample Products: Body Illustrator, Kryolan BIC, Temptu Duracolor
Pros: Stays put extremely well!  Completely waterproof, lasts for days, doesn't rub off on clothes
Cons: Limited color palette, expensive, can be difficult to remove (needs 91% or 99% alcohol for removal)
Comments: This is the only make-up of the three that I haven't tried, though I came really close to buying some.  Alcohol activated make-up uses 91% or 99% alcohol for application, and needs the same alcohol for removal.  Because of this, it's completely waterproof, extremely durable, and doesn't rub off on clothes.  Unfortunately, it's not available in a wide range of colors.  Temptu Duracolor is one of the very few brands that offers a wide range of colors sold on their own; other brands like Body Illustrator only offer pallets of a variety of colours more geared towards things like gore makeup or creating bruises, etc.  The really big downside to these make-ups is they are expensive.  A 4oz bottle which would be enough for about 1-2 body applications costs $31.50 online.  I personally haven't tried the Temptu because they didn't have a color that was right for Aria, and I would have had to spend $60+ to get 2 different colors to mix, which I wasn't willing to do at the time.  However, if you have a costume that you just can't risk the color rubbing off on to, it's definitely worth the investment.

Tuesday, July 9, 2013

Making Aria - Asari Headpiece - Part 1

Since this whole costume is going to make for one massive write up, I'm breaking it up in to sections. The first 2 parts will be the asari headpiece.


Part 1: Life casting, sculpting and mold-making
Part 2: Casting, painting, and make-up.


I followed this tutorial by tattered-hood on Deviantart very closely, so if you’re thinking about making your own asari head piece, I recommend you check it out! She did a great job breaking everything down in to simple to follow steps, and I wouldn't have been able to do it without her. Another resource I highly recommend is The Monster Makers Mask Makers Handbook. It's less than $7, and the information in the pdf is invaluable for someone who's never worked with molding and casting latex masks before.

Life Casting

Tools required:

Bald cap (And spirit gum to apply it)
Vaseline
Plaster bandages (I used one package, but 2 would have been better)
Ultracal 30 (try and find it locally if you can, since shipping it will cost a fortune.  You can sometimes find it in clay stores, or possibly drywall suppliers.  Just check around!)
Metal files (to clean up your life cast)

The first step in the entire process was getting a life cast so that I would have something accurate to sculpt on. There are two options: Buying a pre-made armature, or making a life cast of your head (either using alginate, or plaster bandages). Since I didn't need a super detailed armature that alginate would provide, I went the cheaper route and got my husband to wrap my head in plaster bandages.


I don't have a ton of pictures of the following steps, since I was getting plaster wrapped.

It basically involved:

Applying a bald cap to cover up my hair
Covering my face and neck with copious amounts of vaseline (especially anywhere there’s hair!)
My husband began covering the back half of my head and neck with plaster bandages (about 3-4 layers thick)
The bandages were allowed to cure for half an hour


More Vaseline was applied to my face (just in case!) and along the edge of the plaster bandages where there would be a seam (they overlapped by about 1/2 inch). Bandages were now applied to the front of my face and neck, making sure to leave an opening around my nose so I could breath. The bandages were again allowed to cure for about 30 minutes  (don’t move while they’re curing!)


The two halves were pried apart and I was freeee!


I set the two halves somewhere safe to fully cure overnight.  The following day they were put back together, and filled with Ultracal 30 to make the head cast.


Since this was my first time working with Ultracal, I wasn’t really sure what I was doing, so my life cast came out relatively lumpy, and had odd discolorations.  The ultracal also seemed to expel a lot of water while it was curing (the bucket I was using had a substantial amount of water in it after the ultracal had cured, and there were puddles of water on top of the head cast, and soaked through the plaster bandages)


In retrospect, I suspect these were caused by:


a) Adding too much water to the ultracal.  I had initially tried measuring out the water to ultracal ratio by weight, and I was using a wildly inaccurate scale.  I probably had way more water than I should have.  The next time I used ultracal was to make the mold of my sculpt; this time I used the "dry river bed" method of mixing the ultracal and water, and this technique worked much better.


b)  I don’t think I mixed it well enough, because I was worried about mixing too much air in to the gypsum cement and getting bubbles in my cast.  This is probably what caused the odd discolorations on my head cast.


The good news is that even with the problems that occured during casting, the head cast still came out perfectly usable for my purposes.  It didn’t need to be pretty, since all I was going to be doing was covering it in clay.


I filed down a couple of rough spots where the seams of the mold had met up, and then got to work sculpting the head piece.


Sculpting

Tools Required:
Old based Clay (If you ever plan on reusing this clay for silicone molds in a different project, get sulfur free clay)
Sculpting tools
Texture stamps (Optional; I made mine out of Pluffy Sculpey)
Krylon Crystal Clear


I used Van Aken Protolina clay in medium hardness.  This is a non-drying, oil based clay that was pretty easy to work with.  The nice thing about using oil based clays is that you’ve got a long time to work on the project.  The sculpting aspect took about 60 hours from start to finish (but would probably take less time for someone more experienced with sculpting).


Initial progress while I got used to sculpting; I began by blocking out very rough, basic shapes.


Once the basic shapes were in, I started adding some detail in to the back of the head.


....At which point I apparently stopped taking progress pictures until I had finished the sculpt.  Each of the head tentacles has an aluminum foil core for stability.  It was getting pretty warm while I was sculpting, and the aluminum inside helped the tentacles hold their place, instead of drooping downwards.

To get a smooth surface on the clay, I found that using a clean spoon did wonders for smoothing out lumps.  You can also take 91% Isopropyl Alcohol and rub it around on your sculpture to smooth out things like finger prints.


 Asari have a very interesting, almost scaley looking skin, similar to what you might imagine dinosaur skin to look like.  I could have sculpted individual scales in, but honestly didn’t have the experience or know-how to make them look good.


To make the texture stamp, I used Pluffy Sculpey clay and stamped styrofoam in to it.  I then carefully baked the Sculpey for about 15 minutes, and when it came out of the oven I had the perfect texture. The advantage of using the Pluffy Sculpey is that the pieces are still somewhat flexible after baking, so that you can get the texture in to really small or curved areas.


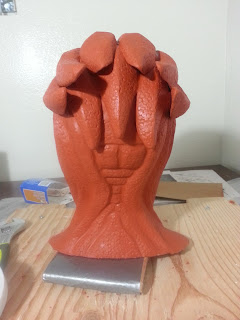
I applied this texture all over the sculpt.


At this point I gave the sculpt a couple of layers of Krylon crystal clear coat to seal it. This makes it easier to remove the clay from the mold later.

At this point, take lots of pictures and admire your work of art:  You are never going to see it whole ever again.

And we're ready to mold!


Molding

Tools:
Plastic buckets (1 for rinsing your hands in, 1 to mix ultracal in)
Water based clay
Ultracal 30 (+water)
Respirator (for mixing Ultra Cal 30)
Burlap, cut in to strips
Rubber Kidney
Chip brushes (several)
Vaseline
Chisel or flat head screwdrivers
Hammer

I used a waterbased clay to make the mold walls, carefully dividing the sculpt in half along the center. This is where the two halves of the mold will eventually join. Make sure that the seam where the water based clay meets the oil based clay is as clean as possible, so that no ultracal will seep underneath. I took a small, damp paintbrush and brushed the waterbased clay where it met the oil based clay, creating a smooth seam line.
Water based clay is used for the mold walls because it pulls off easily from the oil based clay and won't mar the sculpture
The round circles on the mold walls are called "registration keys".  These will help the finished mold align.
Following this, I started to brush on a thin layer of Ultracal 30. This is called the "beauty coat" and is supposed to catch all the tiny details of the sculpt.

Add 2 inches of cold water to a small mixing container (I used a 32oz yogurt container) and then slowly sift Ultracal in to the water. Keep doing this until clumps of ultracal appear above the water and start forming cracks that look like a dry riverbed. Mix the ultracal until there are no lumps.

Begin brushing the ultracal on to your sulpture, getting it in to all the cracks and crevices, and make sure there are no air bubbles. At first, the ultracal will just drip down the sculpture, but as it begins to cure and get thicker, it will be easier to spread around. Make sure you cover all of the clay.

I followed this with 1-2 more layers of brushed on Ultracal. The clay sculpture should not be visible underneath.


The final layer of the mold was burlap strips dipped in ultracal, and applied to the outside of the mold. 3-4 layers of burlap were applied. This helps strengthen the mold, and will prevent it from cracking later on. After the burlap layer has started to thicken, use a rubber kidney and smooth out the outside of the mold. Once it has thickened a little more, you can make it even smoother by rubbing a piece of burlap on the outside.


Once the ultracal cured (about 30 minutes; it will get really hot, harden, and then cool down) it was time to flip the mold on to it's other side, and repeat the same steps for the second half.

Before adding any ultracal to the second half of the mold, make sure to put a thin layer of vaseline around the cured ultracal, and inside of the registration keys.  This is super important!  If you do not do this, your mold will not come apart!  You should also make sure to put several pry points along the edge of the mold to make seperating it easier.


I sadly did not take any pictures of the finished mold before prying it apart.  (I guess I was just that excited!).  After the second half cured, I did have some problems seperating the mold.  Some of the ultracal ended up overlapping the seam, and my one of my registration keys had the opposite effect of what I hoped and locked my two mold halves together.  I very slowly and very carefully chiseled away at the edge of my mold (which I do not recommend AT ALL since there is a high chance of you ruining your mold) until I was able to pry the two parts in half.

When prying your mold apart there is a strong likelyhood (especially with something like an Asari head that has a lot of undercuts) that your sculpt is not going to come out of this whole.

Here are some sad pictures of my destroyed sculpt.


But on the bright side, the mold turned out pretty well! It took a long time (about 4 days) and a lot of maneuvering to clean all the clay out from the tentacles. Some of them came out really easily, but about 3 or 4 of the tentacles ended up getting clay stuck in the tips. I had to carefully scrape the clay out with some shortened wooden tools, and then used q-tips and rubbing alcohol to clean the rest of the clay out of the tips of the tentacles. It was a long and arduous process, but well worth it in the end

After the mold was cleaned out, I sealed the mold together along the outside seam with some more burlap and ultracal; I did this because I would easily be able to pull the finished latex headpiece out of the neckhole.

I patched the inside center seam of the mold with apoxie sculpt, and did the same with a few large air bubbles that had occured while making the mold.

Patching the center seam with apoxie sculpt

I filled any bubbles like this with apoxie sculpt

And, once that was finished and cured, it was casting time!

Thanks for reading!  I hope to have Part 2 up shortly after SDCC, where I will be making a video of how to apply the head piece and blend it in to your skin!